Enabling NAT on VMware ESX with help of IPCop
VMware’s desktop products like Workstation include abilities to connect virtual machines (VMs) to outside network via NAT, but professional ESX hypervisor does not include any networking features (besides virtual L2 switches). So all such features must be done via a dedicated VM. One of the solutions is to use a small and efficient Linux distribution called IPCop. It requires only about 300 MB of disk space and maybe 256 MB of RAM (although I recommend to give it 512 MB of RAM and 512 MB of disk space).
What you need:
- ESX server (I use v6.0)
- Two public IPs (one for ESX itself, one for IPCop external “Red” network interface)
- IPCop installation CD (available on its homepage http://www.ipcop.org/download.php)
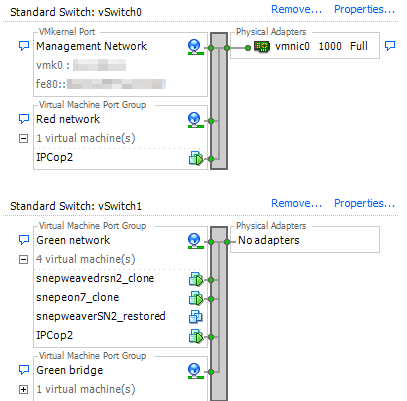
In my example I have default ESX vSwitch 0, which is connected to the only physical network card of my server (so it has ESX public IP configured). I have named it “Red network” to be consistent of the IPCop naming. However individual VMs cannot be connected to this switch as each of them would require their own public IP. So instead we create an isolated virtual network (vSwitch 1) called “Green network”. As you can see this one does not contain any physical adapters, so the VMs are not able to communicate with outside world on their own. VMs will have private IPs and IPCop will provide them DHCP, DNS and internet access via NAT.
First we need to create a new VM, where we will install IPCop. Unfortunately it is not straightforward, because IPCop’s kernel does not include some of the usual drivers. The important parameters we need to set up are:
- Guest operating system: Other 3.x or later Linux (32-bit)
- 1 CPU socket, 1 CPU core
- 512 MB RAM, 512 MB disk space (or more)
- 2x Network: adapter type E1000, assign one to “Red network” and one to “Green network”
- SCSI controller: BusLogic Parallel (this is most important as otherwise IPCop won’t detect any harddisk)
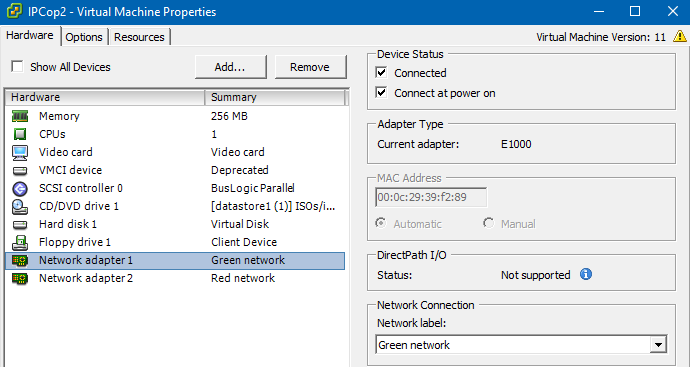
Now you can connect the installation CD iso image to the virtual CD/DVD drive and start the installation. The process is easy, just follow the IPCop’s manual. You can identify the Red/Green network during installation by looking at the MAC address in the VM’s properties (as seen on the image above). Configure your Red interface with the connection type you have from your network provider (DHCP in my case) and don’t forget that IPCop must use an IP address which is different from main IP assigned to ESX itself.
Just don’t forget to assign any new VMs just to the “Green network”, so it will get internet connection via IPCop. For more advanced users IPCop supports also DMZ network and OpeVPN access (so that your PC can be part of the virtual VM network and you can directly connect to them).
If you want to install VMware Tools in IPCop, I have a guide for that too: How to install vmware tools on IPCop virtual machine